
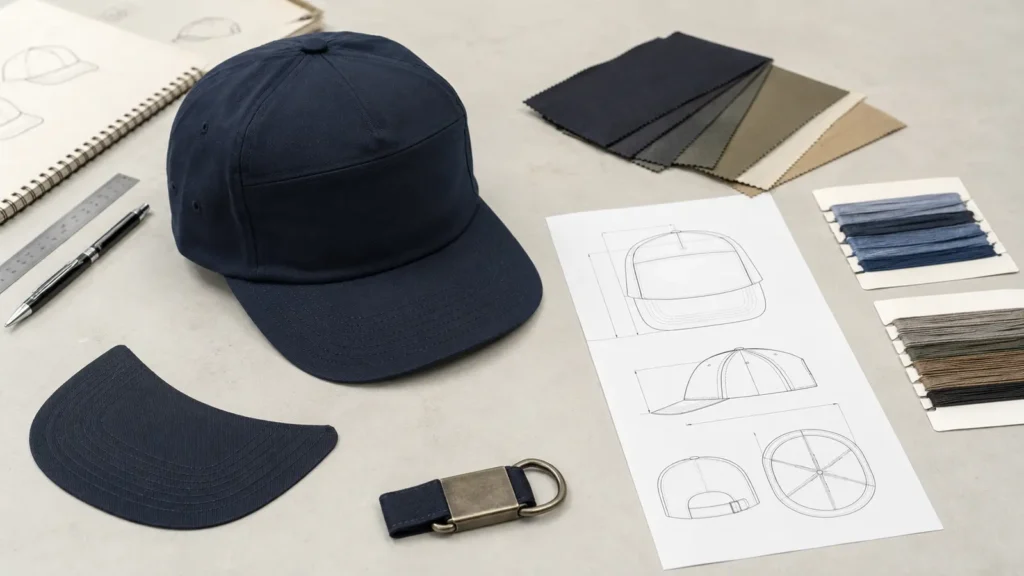
A factory can sew a great cap. It cannot read your mind.
If your brief says “premium custom hats, nice fit, logo on front,” the sample room still has to guess. Which crown shape? What fabric weight? How large is the logo? Where does the brim curve begin? A smart factory will ask questions. A rushed one may make choices for you.
A custom hat tech pack removes that guesswork. It turns your design into one clear set of instructions for the brand, factory, sample room, and quality team. It also gives the first sample a job: prove the fit, look, function, and build before bulk production begins.
Quick answer: A factory-ready custom hat tech pack should define 12 areas: project goal, cap construction, fit, materials, colors, brim, closure and inside parts, decoration, labels and packing, performance, sample acceptance, and version control.
What Makes a Custom Hat Tech Pack Factory-Ready?
A polished PDF is not automatically a useful tech pack. The real test is simple: can a new sample maker understand the current product without searching old emails or chat messages?
A strong file does three things. It shows what the hat should be, explains how each key detail will be checked, and separates final choices from open questions. This matters because custom hats are three-dimensional products. A front mockup cannot fully show crown depth, rear opening, inside parts, brim stiffness, or how a logo sits on a curved panel.
The tech pack should work with the approved physical sample. The file states the target. The sample shows how that target looks and feels in real life. Together, they support a cleaner custom hat development process and a more repeatable bulk order.
Use Four Decision Labels to Stop Guesswork
Not every detail will be final on day one. That is normal. The mistake is leaving an open point unlabeled. Give every important line one of these four statuses:
- Locked: approved and not open to change without written permission.
- Match Reference: follow a named physical sample, signed swatch, or approved artwork.
- Factory to Advise: the goal is clear, but the factory should suggest a workable option.
- N/A: the item does not apply to this style.
This small system prevents a common problem: one team treats a note as final while another treats it as a suggestion. “Premium” is a goal, not a measurement. A status plus a clear standard gives it meaning.

Download the editable Custom Hat Tech Pack Starter Workbook
The 12 Details to Confirm Before Sampling
1. Project Header and Product Use
Start with the style name, code, season, target wearer, use, sales channel, planned quantity, sample deadline, and launch date. A golf cap, trail cap, team cap, and streetwear cap may share a basic shape, but they do not share the same product goal. This short project header helps the factory judge later choices in the right context.
2. Hat Body and Construction Views
Show front, side, back, top, and inside views. Mark the panel count, panel shape, seams, eyelets, top button, front support, and any laser-cut zones. State whether the crown is structured, soft, high, low, or based on a named reference. “Baseball cap” describes a family, not one universal body.
3. Fit and Points of Measure
List each point of measure, or POM, with a drawing, target value, unit, tolerance, and measuring method. Common points include the inside head opening, crown height, front panel width, brim length, brim width, rear opening, and closure range. If you have a cap with the right fit, name exactly what should match. Do not ask the sample room to scale a photo by eye.

4. Materials and Bill of Materials
Build a bill of materials, or BOM, for every visible and hidden part. List the shell, mesh, under-brim, sweatband, seam tape, buckram, backing, closure, labels, and trims separately. Fiber content alone is not enough. Add fabric type, weight or approved hand feel, finish, stretch direction, surface look, and reference code. If an alternate is allowed, state what may change and what must stay fixed.
5. Color Standards
Give each fabric, thread, patch, rope, label, plastic part, and metal finish its own color reference. Use a color code when helpful, but approve a physical swatch when color is critical. The same navy can look different on cotton, polyester, rubber, and metal. Review the complete cap under normal light, not only separate pieces.
6. The Complete Brim System
Treat the brim as a system, not one line in a table. Confirm finished length, width, curve, core material, stiffness, edge, stitch rows, and upper and lower fabrics. If the cap needs a special curve, approve the finished shape. Add packing notes when pressure in transit could flatten or bend it.
7. Closure and Inside Parts
Name the closure type, material, color, usable range, hardware finish, and strap-end treatment. Show the rear opening shape and explain whether the strap stays outside or tucks in. Also define the sweatband, seam tape, reinforcement, lining, and embroidery backing. Customers may not see every inside part, but they will feel the result.
8. Decoration Map
For every logo or graphic, show the panel, finished width and height, distance from seams, colors, artwork file, and production method. State whether it is flat embroidery, 3D puff, a woven patch, rubber patch, heat transfer, or print. Match the method to the chosen fabric and curve. For embroidery near laser holes, mark a no-hole decoration zone. Always approve a strike-off or decorated sample on the real material.
9. Labels, Hangtags, and Packing
List the main label, care label, size label, hangtag, sticker, bag, insert, barcode, and carton mark. Include artwork, material, size, placement, attachment method, and packing quantity. The packing plan should protect the crown and brim. A perfect sample that arrives crushed is not a perfect delivery.
10. Performance Requirements
Words such as quick-dry, water-resistant, breathable, or sun-protective need a test plan. State the exact feature, test method, pass level, sample stage, and responsible party. A fabric result may not equal a finished-cap result because seams, vents, decoration, and construction can change performance. Brands developing technical styles can compare the required build with JoinTop’s custom performance cap options.
11. Sample Acceptance and Tolerances
Tell the first sample what it must prove. Set pass, check, or revise rules for fit, crown shape, brim, color, decoration, stitching, comfort, function, labels, and packing. Use numbers where they help, but also include a wear test and visual review. One measurement can pass while the cap still feels wrong. Connect the approval points to your wider custom hat quality control plan so bulk inspection checks the same standards.
12. Version Control and Final Approval
Put the version number and date on every page. Keep a revision log with the issue, requested change, owner, status, and approved result. Name the current artwork, swatch, test report, and physical sample. Retire old versions when a new one is approved. A file called “final_v8_really-final” may be funny once. It is less funny when 5,000 caps are being packed.
Run This Five-Minute Red-Flag Test
Before you release the tech pack for sampling, hand it to someone who was not in the design meeting. Ask that person to find the answer to these questions:
- What is locked, and what still needs factory advice?
- Which file or physical reference controls each key detail?
- How will fit, logo placement, color, and brim shape be checked?
- What is the first sample expected to confirm?
- Which version is current, and who can approve a change?
Write a reference order too. For example: latest written tech pack, approved artwork, signed fabric swatch, approved physical sample, then earlier mockups. This matters when two sources disagree. If the sample has the right crown but an old logo position, say so. A reference without a clear priority can solve one question and create two more.
If an answer lives only in an inbox, move it into the tech pack. If two references conflict, choose the priority. If a choice is still open, label it. The goal is not a longer file. The goal is a file that lets the right people make the same hat.
A Better Sample Starts With a Better Brief
A clear custom hat tech pack does not guarantee a perfect first sample. Physical products still need testing, wear checks, and careful feedback. It does make the first round more useful. Instead of spending that round collecting basic answers, your team can judge the choices that matter: fit, feel, function, brand look, and production repeatability.
If your brand is preparing custom hats, send JoinTop your current tech pack, reference photos, artwork, estimated quantity, and launch target. We can review the project requirements, identify open points, and discuss the next sample step. Send your custom hat brief for review.


 English
  German
  Spanish
  French
  Amharic
  Portuguese
  Italian
  Swedish
  Turkish
  Belarusian
  Danish