
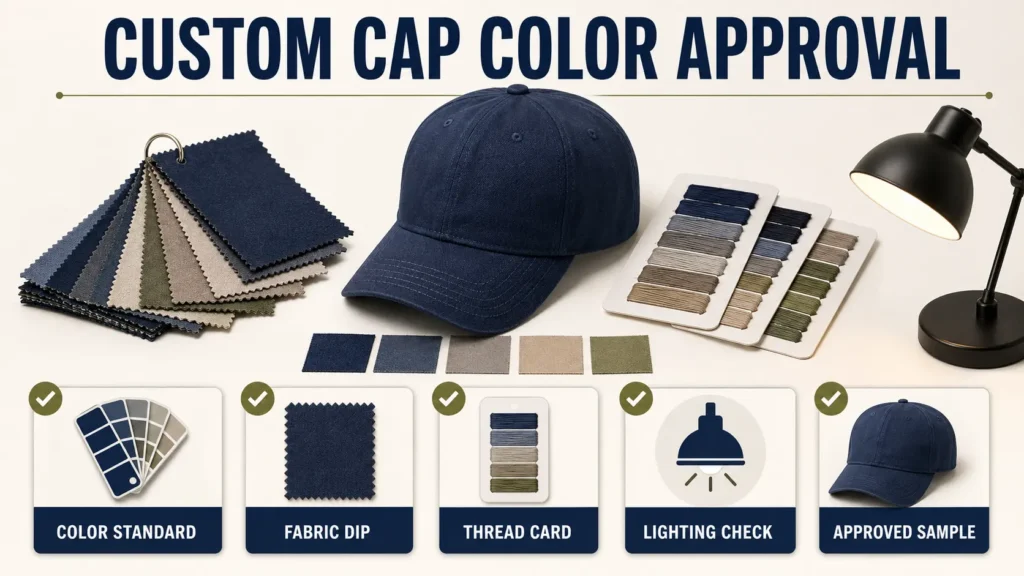
A brand color can appear correct in an email and wrong on the finished cap. Screens differ. Fabric has texture. Thread reflects light. A silicone patch has a different surface from cotton twill. Even two dark navy materials can look unrelated under store lighting.
A reliable custom cap color approval process treats the cap as a group of materials, not one digital color. It gives the factory a physical target, records what was approved, and checks how the full product looks under agreed conditions.
Broad searches for custom baseball caps often treat color as a design choice. For a mature brand, color is also a supply-chain control: several materials, suppliers, lots, and delivery seasons must still look like one planned collection.
Do not use a screenshot as the final color standard
RGB and hex values help designers work on screens. They do not fully describe dyed fabric or embroidery thread. Start with the best brand reference you have. For textile projects, a physical color standard is more useful than a phone photo. Pantone explains its textile systems on its textile color page.
Name the system, code, edition where relevant, and physical reference owner. If your brand approves a custom lab dip instead, number and date that approved swatch. Do not write only “match our blue,” because several departments may hold different versions of the blue.
Map every visible cap component
The cap body is only the start. List the crown fabric, brim top, brim underside, eyelets, button, sweatband, closure, embroidery thread, patch, label, tape, and packaging accents. Decide which parts must match and which may use a planned contrast.
| Component | Approval reference | Likely check |
|---|---|---|
| Main fabric | Physical standard or approved lab dip | Hue, depth, texture, finish |
| Embroidery thread | Named thread card and number | Color on the actual fabric |
| Patch or print | Approved material sample | Surface, opacity, edge, contrast |
| Plastic or metal trim | Supplier chip or approved sample | Match or planned contrast |
| Labels and tape | Artwork plus physical strike-off | Color and readable copy |
| Packaging | Printed proof and production sample | Brand consistency outside the cap |
Use the component map in the custom hat tech pack. It prevents a team from approving the fabric while forgetting that the back strap or thread is still an open color.
Circle every open item. Do not let an unmarked trim become a last-minute factory choice.
Build a color master hierarchy for the whole program
Teams often hold several “approved” references. These may include a brand book value, textile chip, lab dip, thread card, logo strike-off, and signed cap. Each one serves a different job. Name which reference controls each material and which finished sample controls the full product look.
Set a hierarchy that can be followed after the original developer is no longer on the project. A typical record may start with the brand direction, move to the material-specific physical standard, then the approved component sample, full cap master, and production limit samples. If two references disagree, the hierarchy should tell the team which one wins or who must decide.
For multiple colorways, use a matrix rather than separate email threads. List each SKU, component, reference code, source, approval status, owner, date, and applicable market. Keep tonal and contrast relationships visible. A navy-on-navy cap may use several different physical materials that should look related without being identical.
Also define substitution rules. A trim supplier, dye lot, coating, or thread source may change. The factory should know which substitutions need a new physical approval and which can be accepted within the signed limits.

Approve fabric and thread as a combination
A thread number alone does not show how the logo will look on the cap. Dark fabric may reduce the apparent brightness of nearby thread. A glossy polyester thread can look lighter than a matte patch in the same color family. Ask for the chosen thread on the actual fabric or on the cap sample.
Physical thread cards create a more stable reference than screen images. Madeira’s thread resources and color matching information can help teams discuss a named thread choice. The final approval should still be based on the exact material combination your product uses.
Prioritize the highest-risk colorways
Not every combination carries the same risk. Light colors may show stains, show-through, or dirt. Dark colors may reveal salt marks or surface change. Bright brand colors may be difficult to align across matte fabric, glossy thread, rubber, plastic, and printed packaging. Custom-dyed materials and special finishes may add another approval step.
Rank each colorway by sales importance, match sensitivity, number of materials, performance exposure, and reorder risk. Use that ranking to decide where a lab dip, strike-off, full cap sample, formal test, or early production check is needed. This is more useful than applying the same approval effort to every SKU.
Keep the rule simple: a high-volume core color or a protected brand color deserves stronger evidence than a low-risk stock neutral. The exact tolerance must still come from the brand and material process; do not copy a number from an unrelated product.
Control the viewing conditions
Colors can look different under daylight, office light, retail light, and photography lamps. Compare the standard and sample side by side under at least the light conditions that matter to your sales channel. State the viewing setup in the approval record. Do not move the standard and sample to different sides of a bright window.
Check the cap from the same direction because twill, brushed fabric, and other surfaces can change with the viewing angle. Turn both pieces together. If two materials match under one light but separate under another, record it and decide whether that difference is acceptable for the product.
Set a tolerance your team can apply
“Exact match” may sound strict. It does not tell an inspector how to judge normal production change. Your company may use color data, a visual limit sample, or both. Choose a method with your material supplier, factory, and quality team. Name the person who can approve it.
Keep an approved standard and, where helpful, an upper and lower visual limit. Protect physical samples from light, dirt, and uncontrolled handling. Replace them when they fade or become unreliable. Record lot numbers for custom-dyed fabric so a reorder can be compared with the original approval.
Check color performance for the real use
A correct starting color can still change during wear. For caps used in heat or sport, consider how sweat may affect fabric, thread, and transfers. ISO 105-E04 describes a laboratory method for color fastness to perspiration. Your testing plan should state the material, method, requirement, and responsible laboratory; do not claim a cap “passes” without a real test result.
Other products may need checks for rubbing, washing, light, water, or cleaning methods. Select tests based on the cap’s intended use and care instructions. Review the full decorated product when possible, not only an undyed fabric data sheet.
Approve in stages and keep one master record
Approve color in clear stages. Start with the digital direction and physical standard. Then review the lab dip or swatch, logo strike-off, full cap sample, and production reference. The exact steps depend on the material and order. Number every color version.
Photos support discussion. They do not replace the physical standard. Mark the part that is wrong. Then state the change, such as “main fabric is too red compared with approved swatch B-02.” Follow the version-control method in JoinTop’s sample feedback guide.
Carry color approval into bulk inspection
Put the approved material swatch, thread numbers, patch sample, and full cap master with the production file. Inspect early material or pre-production output before all units are completed when color risk is high. At final inspection, compare production under the agreed conditions and check that mixed lots have not created visible groups.
The JoinTop hat quality control process shows how approved references can move from sampling into production checks.
Control lot changes and reorders
A reorder can use the same color code and still look different if the fabric lot, thread source, finish, or supplier changes. Before production, compare the new material with the retained master under the approved viewing conditions. If the master has faded or been damaged, do not use it as silent proof; replace it through a recorded approval.
When several factories or production bases support one brand program, distribute controlled references and use the same component map, viewing method, and decision owner. Photos can help teams communicate quickly, but physical standards and signed samples remain the stronger production reference.
After delivery, record color issues by SKU, lot, material, and market. This lets sourcing and quality teams separate a one-time handling problem from a repeatable match risk, and it improves which colorways receive extra checks in the next buy.



 English
  German
  Spanish
  French
  Amharic
  Portuguese
  Italian
  Swedish
  Turkish
  Belarusian
  Danish